Obstacles here and there
Coming back to work on the RG Exia while I try to figure out the dilemma for the D-Style Gustav. With the head, weapons and legs done, the next section to assemble would be the chest and waist.
Pieces for the chest
I would like to point out some difficult parts I encountered during the assembling process. The first issue are the front and rear skirts area. The pieces are a bit tricky to assemble. Not only they are small but the way they go together really test out your patience. Just remember to keep calm and all will go well. It took me some tries before I finally got it in place.
The other issue I encountered was the loose 'antenna' on the chest. It does not stay in place and it always wants to be folded down. The hard part is you will need something sharp to hook it up. The last issue I encountered will be the GN drive. This is not really an issue but just something to be on the lookout for.
You will have to properly align the GN drive properly in order for the 'clamps' to 'hold' the GN drive. The first time I did that, the GN drive was not in the proper location and when I close the 'clamp' on it, some gap can be seen. The good thing is the GN drive is really a tight fit. The bad thing is that it is so tight that when I had to pull it out, the GN Drive disassembled itself into their original pieces. I had to re-assemble the drive before trying to place it in the correct position.
When the chest section was completed, I top coated it and left it to dry.
Waiting for the top coat to dry
A quick 360° view after the top coat is dry.
Top view of the chest
Front and back view of the chest and waist section
Left and right view of the chest and waist section
There is nothing much to say about this. The gimmicks for this section is the beam saber handle at the back of the skirt. It can be rotated up and down and left to right. This is for Exia to be able to reach for the back handle. Weather this kit is able to do it remains to be seen.
Left: Left and right movement
Right: Up and down movement
Both handles are able to swivel to the deploy mode
With the chest section done, the only section left would be the hands. While I was getting all the parts out from the box to be lined up, I misplaced the small clear green part for the right hand. I thought this will be another RG kit with a lost part. I had to tear open the paper container box to make sure that it is not in there.
I was upset that the piece was not hidden in between the boxes. I decided to just have a look on the floor in case I accidentally dropped it without my knowledge. Imagine how happy I was looking at the floor only to find it lying there. I think working on the RG line is both the most rewarding and also the most stressing at the same time.
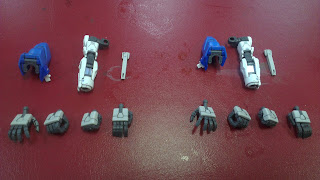
Pieces of the hands before assembly
The hands are a straight forward built. The hands are split into 2 different sections. One is for the hands and the other is for the shoulder. There is a small issue with the shoulder part. There is a blue strip which connects from the shoulder to the hands. Issue encountered: Attaching the blue strip to the hook at the shoulder. This is one of the trickiest blue strip to attach because of the angle the strip has to be. But as with all scale models, a bit of patience and all will go well.
Assembled arms and shoulders
Completely assembled hands
With the hands being the last to be completed, the armouring of the inner frame is now finished. The next post will be putting it all together to form the Mobile Suit Exia.


No comments:
Post a Comment